
ADBnox Print User Guide
ADBnox Print prints from Android to network, USB, Bluetooth and Wi-Fi Direct printers, scans with multifunction devices and copies documents with the camera. It includes PCL and PostScript drivers for office printers and ESC/POS, ZPL and CPCL for receipt and label printers. Documents are processed on the phone; no cloud account, root, ADB or Shizuku needed.
This guide walks through every screen of the app: what it is for, what you need, how to do it step by step, what you will see, what can go wrong and how to fix it.
00 About this guide and compatibility
Button names follow the English interface; in Turkish they are shown in Turkish. The screenshots are taken from the real app. The app's own Help & Guide screen is a short summary of this page.
How does ADBnox Print print?
A printer prints only the language it understands. ADBnox Print turns the document into pages on the phone, converts them into the printer's language (PWG Raster, Apple Raster, PDF, PCL, PostScript, ESC/POS…) and sends them straight to the printer. There is no server or computer in between.
| Printer language | Which printers |
|---|---|
| Driverless: PWG Raster, Apple Raster (URF), PDF, PCLm | Network printers with IPP Everywhere, AirPrint and Mopria. Chosen automatically from the capabilities the printer reports. |
| PCL 5, PCL 6 (PCL XL), PostScript Level 2 | Office and enterprise printers, especially over USB and RAW (9100). PCL 6 is the default for Konica Minolta and Develop printers. |
| ESC/POS | 58 and 80 mm thermal receipt printers; Turkish PC857 character set, cutter. |
| ZPL, CPCL | Zebra and compatible label printers. |
| ESC/P | Dot-matrix printers. |
“Host-based” printers that work only with the maker's own computer driver are not supported: for example some HP LaserJets that use ZjStream, Canons that speak only UFR II, and CAPT printers. The app recognises these models and explains why.
Tried on real printers
| Printer | Connection | Result |
|---|---|---|
| Canon LBP251 | IPP (network) | Test page printed with driverless PWG Raster. |
| Develop ineo 283 | USB | Test page printed with PostScript. |
| Konica Minolta bizhub 367 | USB | Test page and a PDF printed with PCL 6. A job sent while the printer is asleep can be lost; wake the printer before printing. |
| Konica Minolta colour (36C series) | USB | Colour printing with PostScript Level 2. |
Compatibility is not guaranteed for every printer model; real-printer testing continues. If you tell us how a printer worked for you, we will update this table.
The search box at the top right (/ key) shows only the paragraphs that contain every word you type and hides the rest.
01 Getting started
The screens, adding your first printer and the test page.
Screens
The tabs in the bottom bar:
Home
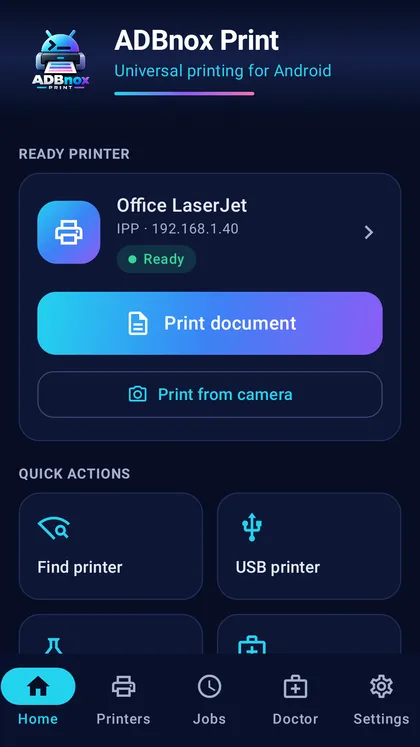
The default printer and its state, Quick actions (Print document, Print from camera, Scan, Find printer, USB printer, Test page, Printer Doctor, POS & labels) and Recent jobs. If your printers are not yet switched on in Android printing, an Enable in Android printing notice appears here.
Adding a printer
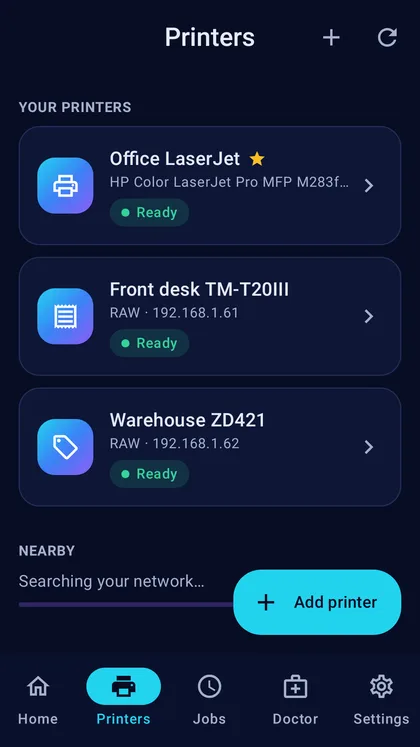
Tap Find printer on Home or the add button on the Printers tab. There are five ways:
| Way | How |
|---|---|
| Network | IPP, IPPS, RAW (9100) and LPD printers on the same Wi-Fi are listed automatically. For printers that don't announce themselves, Scan this network tries ports 631 and 9100 on your local network. |
| USB | Connect the printer with a USB OTG adapter, switch it on and allow USB access when Android asks (see USB printers). |
| Bluetooth | Pair the receipt or label printer in Android's Bluetooth settings first, then pick it from the list (see Bluetooth). |
| Wi-Fi Direct | Without a router, over the printer's own Wi-Fi Direct network (see Wi-Fi Direct). |
| Manual | Enter the IP address or host name, the protocol and, if needed, the port, then tap Test connection. The app tries which protocol works by itself. |
For printers with an NFC mark, holding the phone to it is enough (see NFC). From the printer's page you can print a test page or make it the default printer.
Most office printers make their own certificate for IPPS. When the warning appears while adding by hand, check that the fingerprint matches the one on the printer's web page and tap Trust this certificate; it is then pinned for that printer. Trusted certificates can be forgotten on the printer's Advanced page.
The printer's page
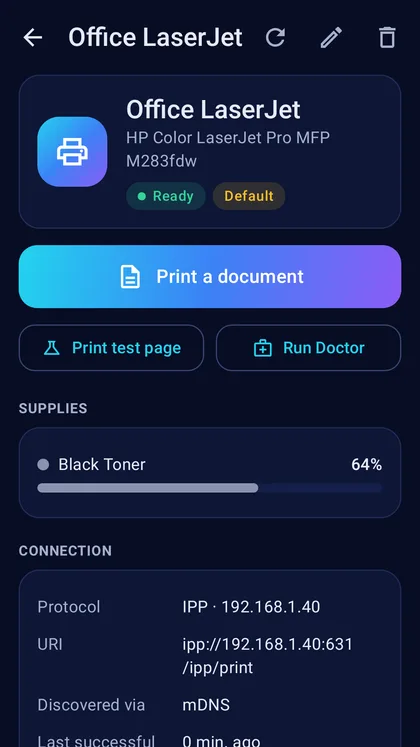
Tapping a printer shows its state, supplies (toner and ink levels, if the printer reports them), connection, the capabilities it reports and the driver in use. From here you print a test page, make it the default and open the Advanced settings.
Test page
The quickest way to try a new printer. The test page has colour and greyscale blocks, fine lines, a resolution pattern, type samples with Turkish characters and a 100 mm ruler.
- If the ruler measures exactly 100 mm and the whole frame shows, scaling and placement are right.
- The header names the printer, connection, driver and resolution, which helps when reporting a problem.
- Tap Test page on Home or Print test page on the printer's page.
02 Printing documents
Tap Print document on Home and pick a file, or send a file from another app to ADBnox Print with Share.
Supported files
- PDF.
- Photos and images: JPEG, PNG, WebP, HEIC, multi-page TIFF.
- Word (.docx), OpenDocument text (.odt) and RTF.
- Excel (.xlsx, .xls), OpenDocument spreadsheets (.ods) and CSV.
- PowerPoint (.pptx, .ppt) and OpenDocument presentations (.odp).
- Plain text, Markdown and HTML.
Documents are processed entirely on the phone; nothing is uploaded.
Preview and page selection
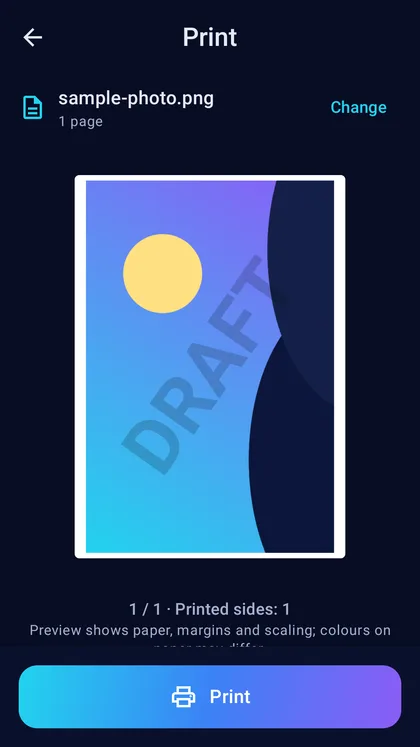
- The preview shows the paper, margins and scaling.
- Tap a page you don't want printed to leave it out; tap it again to bring it back.
- Set the options (see below) and tap Print. The job is followed on the Jobs tab.
Print options
| Option | Values |
|---|---|
| Copies and collation | 1, 2, 3 · 1, 2, 3 or 1, 1 · 2, 2 · 3, 3. |
| Pages | All, odd, even, or a range such as “1-3, 5, 8-”. |
| Two-sided | Long edge (like a book) or short edge (like a notepad). |
| Pages per sheet | 2, 4, 6, 9, 16 and their order; booklet (the stack folds in the middle); page borders. |
| Scaling and orientation | Fit, Fill or Actual size; portrait / landscape; reverse order. |
| Colour and paper | Colour, quality, density, paper size, paper source and paper type, as far as the printer reports them. |
| Watermark | Off, one of your saved watermarks, or one just for this job (see Watermarks). |
Save as this printer's defaults keeps the choices for that printer. Defaults for all printers (paper, quality, density) are in Settings.
Two-sided printing by hand
If the printer doesn't report two-sided printing, the app prints two-sided by hand: the fronts print first, then you turn the stack over into the tray and the backs print. If it prints on one side only although it has a duplex unit, check the Printer turns the paper itself option on the Print screen (see Troubleshooting).
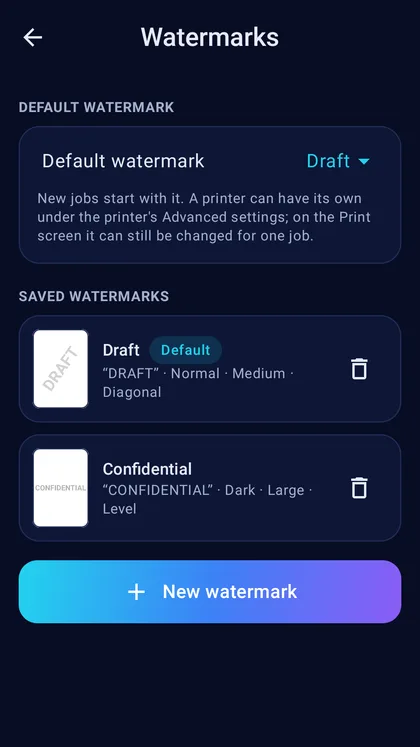
Watermarks
- A watermark can be text (e.g. DRAFT), a logo, or a logo with text under it; diagonal or horizontal; darkness and size can be set.
- On the Print screen, Save as watermark keeps it under a name.
- Settings › Watermarks lists them all and sets the one new jobs start with. A printer can have its own default under its Advanced settings, and it can be changed for a single job while printing.
03 Printing from other apps
Your saved printers can also appear in the Print menu of Chrome, Drive, Gallery, Gmail and office apps.
- Switch the print service on once: Android Settings › Connected devices › Printing › ADBnox Print › On (menu names vary a little between phones). Shortcut: Android print service in Settings.
- In an app choose Print, then pick your ADBnox Print printer from the printer list.
- The options in Android's print dialog follow the capabilities the printer reports. The job's state also appears on ADBnox Print's Jobs tab.
You can also send a file from any app to ADBnox Print with Share, or open it with Open with; it opens straight on the Print screen.
04 Printing from the camera and ID cards
Copy a paper document or turn it into a PDF without a scanner. Tap Print from camera on Home.
Step by step
- Take a photo opens the in-app camera, with the page's edges shown live; the photo goes on to cropping. From gallery picks an existing photo.
- The page's four corners are found from its straight edges, even on a patterned cloth or next to the facing page of a book. If they are off, drag them with your finger. Detected edges goes back to the detected corners, Whole photo uses the entire photo.
- After Next, choose the filter (see the table). Remove shadows evens out the shadow of the phone or your hand and uneven light.
- Reorder, rotate, delete or add pages.
- Edit any page later: tap it. Under Crop move its corners again; Straighten a curved page takes out the bend of a book page near the fold; under Filter change the filter, or apply it to all pages at once. Nothing changes until Apply.
- Print, Save and Share make all pages into one PDF.
| Filter | What it does |
|---|---|
| Auto | Colour when the page has some (even a stamp or blue ink), otherwise grey. Best for most pages. |
| Original | Only straightened. |
| Colour | The paper turns white, colours stay. |
| Grey | Less ink on colour printers. |
| Black & white | Like a scanner; least toner, best for plain text. |
Auto capture and book mode
To take many pages quickly, open Print from camera › Auto capture. It asks for the camera permission the first time.
- Single page: frame the page; its edges are outlined in colour. Hold the phone still, the shutter ring fills and the photo is taken by itself. Then lay down the next page; once the page changes, the next one is taken.
- Book: open the book and frame both pages. The spread is cut at the fold and added as left, then right page. Turn the page; as soon as your hand is out of the way and the page settles, the next spread is taken.
- The same page is never taken twice. Press the shutter any time to take a page by hand; with Auto off, pages are only taken by hand.
- The speaker icon turns the shutter sound on or off, the torch lights the page. The screen stays on while the camera is open.
- The thumbnail on the left shows the last page and the page count; tap it or Done to go back to the pages.
Hold the phone parallel to the page, 30–40 cm above it, with a little of the surface showing around the page. Put white paper on a dark surface rather than a white desk. Lay a book flat and press the pages down gently, keeping your fingers at the edges.
ID card copy
Tap ID card copy: the card's front and then its back are photographed, and both sides go on one A4 page at the card's real size. For two sides added from the gallery, use Combine the last two pages as an ID card.
05 Scanning with a scanner
Scan on Home uses the scanner of multifunction printers and scanners.
| Connection | Which devices |
|---|---|
| Network | Devices with AirScan / eSCL (Mopria Scan) or Windows WSD are found on the same Wi-Fi automatically; otherwise use Add by IP. |
| USB cable | Devices with IPP over USB (most AirPrint or Mopria devices). |
| Wi-Fi Direct | Without a router. |
- Choose the scanner.
- Settings: source (glass, document feeder, two-sided feeder), colour, resolution, area and content type; brightness, contrast, sharpness and compression under Advanced.
- Start the scan. When scanning from the glass, lay the next page and tap Scan next page; pages are added at the end.
- Output can be PDF (one file or one per page), JPEG or PNG. Save the pages, share them or print them straight away.
Manufacturer USB protocols need device-specific support, which is not enabled in this version. Share a USB report to help verify support; meanwhile you can use auto capture with the camera.
06 Receipt and label printers (POS)
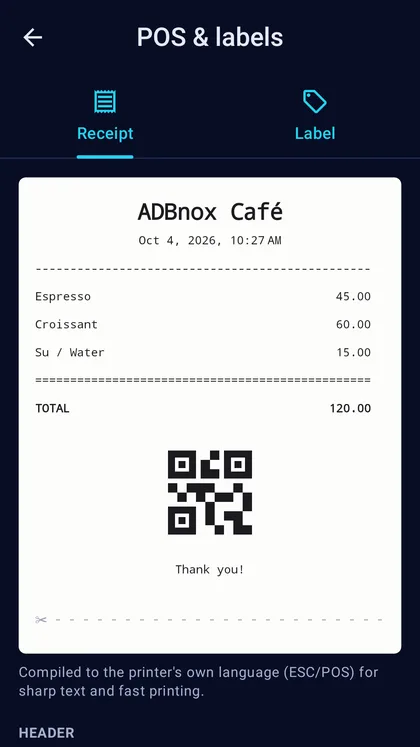
POS & labels on Home is for thermal receipt and label printers. Output is compiled to the printer's own language (ESC/POS, ZPL or CPCL) for crisp text and fast printing.
- Receipt: header, items and prices, total, footer, QR code and Code 128 barcode; the paper can be cut afterwards.
- Label: text, size and number of copies.
- Paper width (58 / 80 mm), label length, printer resolution, print darkness and the cutter are set on the printer's Advanced page.
- For Turkish characters: Settings › Advanced settings › Default POS text encoding: PC857. Newer printers may also support UTF-8.
07 Connections: USB, Bluetooth, Wi-Fi Direct, NFC
USB printers
Connect the printer with a USB OTG adapter and allow USB access when Android asks. Printers of the standard USB printer class work without a computer; the model is recognised from the IEEE-1284 device ID. Even if the printer is slow to accept data, every byte is sent once.
USB printers can't report their features the way network printers do. In the USB section of the printer's page:
- Ask the printer: asks over the cable (with PJL and PostScript) whether it prints colour and has a two-sided unit.
- USB report: saves the printer's USB details for reporting a problem.
- If the printer doesn't answer, set colour and the two-sided unit by hand under Printer hardware on the Advanced page.
Bluetooth receipt and label printers
- Pair the printer in Android Settings › Bluetooth first (the PIN is usually 0000 or 1234).
- Pick it under Add printer › Bluetooth.
- Enter the printer type (receipt or label) and the paper width (58 / 80 mm) or label size. For label printers the language (ZPL or CPCL) can be chosen too.
Wi-Fi Direct
Printers that set up their own Wi-Fi Direct network can be used without a router. Switch Wi-Fi Direct on at the printer and pick it under Add printer › Wi-Fi Direct. The phone joins the printer's network (the printer may ask you to confirm on its display); the connection is made again for every print. Android asks for the nearby devices permission.
NFC tags
Hold the back of the phone to the NFC mark on a printer, scanner or tag:
- The printer's network address, Bluetooth or Wi-Fi Direct details are read; if it isn't saved yet, it is added with one tap.
- Write your own tag: on the NFC screen, Write printer to a tag stores a printer on a blank NFC tag (NTAG213 or larger). Stick the tag next to the printer and anyone in the office can connect with a tap.
- NFC must be switched on in the phone's settings.
08 Jobs and notifications
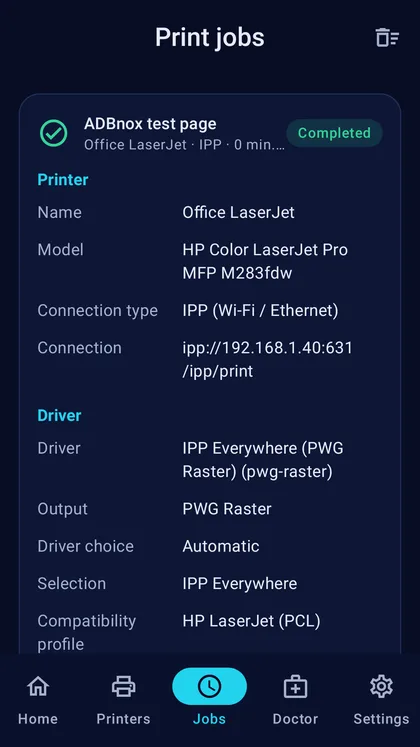
The Jobs tab shows each print's state: queued, rendering, sending, printing, completed or failed.
- Tap a job for its printer, model, connection type and address, driver, resolution, print settings, timings, data sent and error code; Copy details copies all of it as text.
- A running job can be cancelled there; the bin icon deletes finished jobs after asking.
- History keeps each job's name, state, printer, connection, driver and settings — never document contents.
“Sent” means the data was delivered to the printer. Unless the printer reports it, the app does not claim that printing finished; check the paper, especially with USB and RAW printers.
Notifications
Settings › Notifications:
- In-app messages: Short (4 s), Normal (8 s), Long (15 s) or Until I close them.
- While printing: a progress notification. Keeping it on lets long jobs carry on after you leave the app.
- When a job finishes (pages, time and size) and When a job fails (the reason, with a Doctor button).
09 Printer Doctor
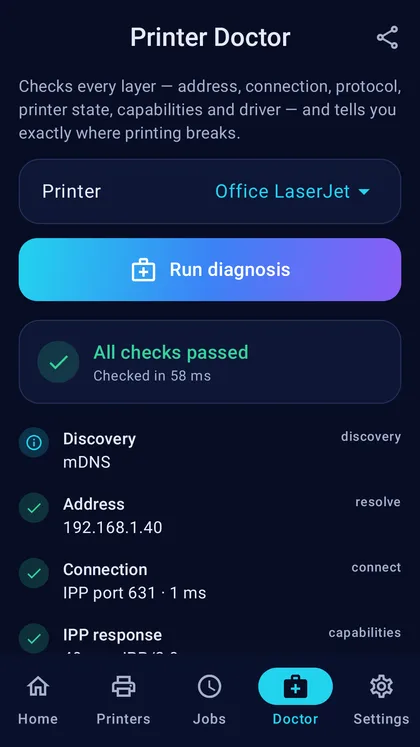
If a print fails or gets stuck, run Printer Doctor from the Doctor tab. It tells you exactly where printing breaks.
- Address: can the printer's name or IP address be resolved?
- Connection: can the port be reached?
- Protocol: does IPP, RAW or LPD answer?
- Printer state: what the printer reports (e.g. out of paper, cover open).
- Capabilities: the features the printer reports.
- Driver: which printer language was chosen, and why.
The problem is shown at the step where it occurs. Share report sends the result for support; Settings › Advanced settings › Verbose engine logging adds raw protocol bytes and timings to the report.
10 Settings and a printer's advanced settings
Settings
| Setting | What it does |
|---|---|
| Appearance and Language | System, Dark, Light or Pure black AMOLED; Türkçe, English or automatic. |
| Printing | Default paper, quality and density; watermarks. |
| Notifications | See Notifications. |
| Android print service | Manage ADBnox Print in the system print settings. |
| Job history | Clear history. |
| Compatibility database | The version and number of printer profiles shipped with the app. |
| About, Help & guide | Version, architecture, protocols, open-source licences and the in-app guide. |
Advanced settings (app-wide)
- Network & Sockets: connection and socket read timeouts, strict TLS certificate validation, continuous mDNS discovery while the app is open.
- Spool & Security: hardware-backed spool encryption (temporary print files are encrypted with Android Keystore AES-256); Clear spool cache.
- Thermal & POS Defaults: default POS text encoding (PC857 for Turkish).
- Diagnostics & Engine: verbose engine logging, automatic network discovery.
A printer's Advanced page
- Connection & Network: protocol, host / IP address, port, IPP resource path, LPR queue name; Test Connection.
- Driver: Automatic (recommended) or by hand (PCL, PostScript, PWG Raster…). Model profile: Match automatically or a compatibility profile from the list.
- Printer hardware: colour and the two-sided unit (because USB and RAW printers cannot report them).
- IPP user name and password: for enterprise printers that require authentication.
- Roll / label: paper width, label length, printer resolution, printable dots, print darkness, auto cutter.
- A default watermark for this printer.
- Trusted certificates: Forget certificates.
11 Troubleshooting
Printer unreachable / offline
- Make sure the phone and the printer are on the same Wi-Fi network. Guest networks and “AP isolation” on the router stop devices from seeing each other.
- Switch off any VPN; local printers can't be reached over mobile data.
- The printer's IP address may have changed: search again under Add printer › Network, or correct the address on the printer's Advanced page.
- Printer Doctor shows whether the problem is the network or the printer.
Blank pages, garbled characters or lots of pages
The printer is being sent a language it doesn't understand (for example PostScript to a PCL-only printer). On the printer's page, pick another driver under Advanced › Driver (e.g. PCL 6, PostScript or PWG Raster), then print a test page. Printer Doctor shows which language was chosen and why.
No two-sided printing, or only one side printed
- If the printer doesn't report two-sided printing, the app prints two-sided by hand: the fronts first, then the backs after you turn the stack over.
- For USB and RAW printers, try Ask the printer on the printer's page, or set Advanced › Printer hardware › Duplex unit: Yes.
- If it still prints on one side only although it has the unit, switch off Printer turns the paper itself on the Print screen.
A job sent to a sleeping printer is lost
Some office printers can miss a job that arrives over USB while they are waking up. Wake the printer by pressing a key on its panel before printing.
The camera doesn't find the edges or doesn't shoot by itself
- Edges are found when the page is lighter than what it lies on. Put white paper on a dark surface.
- Add light or switch on the torch; keep your own shadow off the page.
- Auto capture shoots when the phone stays still for about a second; resting the phone on something helps a lot.
- If only one page of a book is taken, make sure both pages are fully in the frame.
Turkish characters come out wrong on receipts
Set Settings › Advanced settings › Default POS text encoding to PC857; most receipt printers keep Turkish characters in that code page.
Printing stops when I leave the app
Settings › Notifications › While printing must be on; Android lets jobs with a notification carry on in the background. On some phones also remove the battery restriction under Android Settings › Apps › ADBnox Print › Battery.
My printer does not appear in Chrome's Print menu
Switch on the Android print service: Android Settings › Connected devices › Printing › ADBnox Print › On (see Printing from other apps).
12 Frequently asked questions
Are my documents sent to a server?
No. Documents are converted into the printer's language on the phone and sent straight to the printer. The temporary print file is encrypted with a key kept in memory only for that job, and deleted when the job ends.
Which Android version is needed?
Android 8.0 or later; it works on phones and tablets. USB printers need the phone's USB OTG support.
Is internet needed?
No. Printing and scanning happen on the local network, over USB, Bluetooth or Wi-Fi Direct. The phone and printer only need to be on the same local network.
Which printers are not supported?
“Host-based” printers that work only with the maker's own driver (for example some HP LaserJets that use ZjStream, Canons that speak only UFR II, and CAPT printers). The app recognises these models and explains why.
Is there a monthly fee?
No. ADBnox Print is bought once on Google Play; there is no subscription.
13 Glossary
- IPP / IPPS
- Internet Printing Protocol and its encrypted form; the language of modern network printers.
- IPP Everywhere, AirPrint, Mopria
- Printing standards that need no driver.
- RAW 9100 (JetDirect)
- Sending data straight to the printer's port 9100.
- LPR / LPD
- An older network printing protocol.
- mDNS
- How devices announce themselves on the local network; printers are found this way.
- PWG Raster, URF, PCLm
- Page image formats used for driverless printing.
- PCL
- HP's printer language; PCL 6 (PCL XL) is its newer version.
- PostScript
- Adobe's page description language; many office printers understand it.
- Host-based printer
- A printer that expects a special computer driver to prepare the page.
- PJL
- A language for sending job and status commands to a printer.
- ESC/POS
- The command language of thermal receipt printers.
- ZPL / CPCL
- The languages of Zebra and compatible label printers.
- PC857
- An old DOS code page with Turkish characters; used by receipt printers.
- eSCL / AirScan / WSD
- Protocols for scanning over the network.
- Wi-Fi Direct
- Devices connecting over Wi-Fi directly, without a router.
- NFC / NTAG213
- Near-field communication and the most common small NFC tag.
- OTG
- The phone's ability to act as a host for USB devices.